https://hard2bit.wordpress.com/2014/04/23/the-effective-use-of-checkpoint-ips-blade-to-minimize-ddos-attacks-to-your-network/
Cyber-attacks have been almost a common thing in these days. Most of our infrastructures are vulnerable to such situations even we think we are in a safe haven with all the best technologies in the world. One thing we forget is that all these high-end technological products do not have any value, if we do not configure them to fit with what out there. We will try to address this gap by evaluating the available configurations of the most critical network equipment we have in our infrastructures.
In this article, we discuss about the CheckPoint Firewall-1 and its IPS blade configuration to avoid DDOS attacks. Especially in here we will focus on the Geo Protection functionalities of the IPS Blade. Some could think, is it possible to block a DDOS attack of 100Gbps from a Firewall o IPS configuration. How could a Firewall can last with its limited CPU and memory for hundreds and thousands of connections open by the attackers from all over the world at the same time. We might agree with you on this argument though we strongly believe better preparation would give you more time to analysis the traffic vectors for deploy blocking rules them or drop them in a router based Black-hole.
As Check Point IPS security serverity levels are highly connetected to the perforamce levels of the Gateway, in the first stage the following policy configurations can be used. The policy configurations have been proposed using the recents attack methods and possible attacks which might occure in the near future.
As Check Point IPS security serverity levels are highly connetected to the perforamce levels of the Gateway, in the first stage the following policy configurations can be used. The policy configurations have been proposed using the recents attack methods and possible attacks which might occure in the near future.
Apart from that, the proposed policy configurations consult the following information to minimize the performance issues while maximizing the security levels of the gateways.
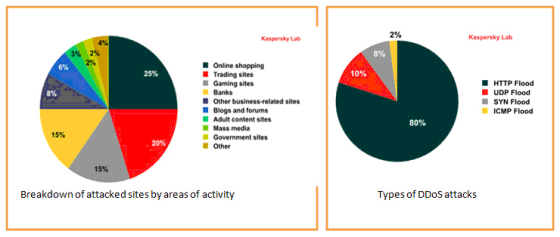
Hence, the volume based configuration will more focus on the following attacks vectors.
- HTTP Flood
- UDP Flood
- TCP SYN Flood
- ICMP Flood
- DNS Flood
- TCP Full Connect
- TCP ACK/FIN/RST Flood
- Non TCP,UDP & ICMP Flood
Step 1: Configure the Bypass Under Load
To minimize the integration issues which might occur when using the IPS in the environment, activating the Bypass Under Load feature will disengage IPS activities. IPS will allow traffic to pass smoothly through the gateway without inspection.
1. In the IPS tab, select the Enforcing Gateways.
2. Select a gateway with critical load issues or the Gateway who is going to activate the IPS licensing and click Edit.
3. Select Bypass SmartDefense inspection when gateway is under heavy load or select a tracking method to log the activity while IPS inspection is turned off.
4. To configure the definition of heavy load and click Advanced.
5. In the High fields specify at what load threshold you want IPS inspection to be bypassed. In here, configure the Gateway to Bypass all the traffic without any inspections.
6. In the Low fields, specify when to resume IPS inspection.
7. Click OK.
Step 2: Configure the Geo Protections
The following section shows the configurations of the geo-protection features of the Check Point IPS. During the last six-months, DDOS attacks have been monitored by 201 countries in the world. However, 90% of all DDoS traffic came from the following 23 countries.
Therefore, the Geo protection policy must be based on the prioritizing these countries. This must be evaluated against your corporation business interest with these countries.
Limitationswe found during the configurations of IPS Blade
- The firewalls themselves need to download the updates, requiring access directly or through a proxy.
- If Geo Protection is set to block traffic to a country and Mobile Access is set to allow an application or site in that country, the traffic will be allowed.
- You cannot modify the country list comes with the Geo Protection of the IPS Blade.
Note: But you can download the country list from their database and review it to find the IP ranges and the country list for possible blockings.
- North Korea isn’t on the country list in older version of the IPS blades (workarounds available)
Note: Have a look the following workaround configurations.
Creative Usesof the IPS Blade and other resources
- There is a workaround to update the IP list manually, which allows you to use a small country like Reunion and assign or exit nodes to it.
- For this we can use the CIDR – Country database developed by the Maxmind or the Check Point database. (http://www.maxmind.com/en/opensource ) under open source licenses.
- See also enabling Check Point’s DShield/Storm Center functionality to block IP address on the lock list.
Turning Geo Protections On
To operate Geo Protection, you are required to have:
- A valid IPS contract.
- A Software Blade license for each Security Gateway that enforces Geo Protection, and for the Security Management Server.
Note 1: This protection is enforced only by Gateways of version R70.20 and above.
Note 2: CheckPoint control connections (such as between Security Gateways and the Security Management Server) are always allowed, regardless of the Geo Protection policy.
Configuration of the Geo Protection (Block/Allow/Monitor)
1. In the SmartDashboard IPS tab, select Geo Protection from the navigation tree.
2. In the Geo Protection page, choose an IPS Profile.
Note: Geo Protection settings are per-profile. You must configure thisprotection on the profile used by the Gateways.
3. Set the Action for this protection: Prevent or Detect or Inactive. When protection is in Detect mode, all traffic is allowed (even for rules where the Action is set to Block), but traffic that matches the rules is logged. Use Detect to try out the protection, or for troubleshooting. When the protection is in Prevent mode, the rules are applied as configured.
4. Define a Policy for Specific Countries. To configure a policy for a specific country that is different than the Policy for Other Countries:
a) Click Add. The Geo Protection window opens.
b) In the Geo Protection window, select a Country. To quickly find the country, start typing the name in the search box.
c) Choose:
Direction: Either From Country to the Gateway, or To Country from the Gateway, or From and to Country. If From Country or To Country is selected, connections in the other direction are handled according to the Policy for Other Countries.
Action: Either Allow or Block.
Track: Any setting other than None generates a log for every connection that is tracked by this protection. If a connection matches two rules, the first rule is logged.
d) Click OK.
5. Configure a Policy for Other Countries. These settings apply to all countries and IP addresses that are not included in the Policy for Specific Countries. Configure whether to Allow or Block, and a Track setting.
6. If necessary define Exceptions (see “Configuring Network Exceptions” on Page 6). Exceptions are applied before any other defined rule.
7. Push the policy to your firewalls. To see what firewalls are affected by the policy you modified, see the Enforcing Gateways list.
8. Check your logs (SmartView Tracker and SmartEvent Intro) and performance (SmartView Monitor).
9. Make sure the daily updates are working (check $FWDIR/tmp/geo_location_tmp/updates/ on the gateways).
10. Use SmartEvent Intro to view all IPS alerts by Source Country and add additional countries that to the block list according to your business requirements
11. When ready (i.e., you’re sure you won’t be blocking legitimate traffic), update the IPS policy action from Detect to Prevent and push policy to the firewalls.
Post Configuration Testing
- Examine the Policy Preview map. Red countries are blocked and green countries are allowed.
- Let the protection operate for a while and then review the logs.
- To view Geo Protection logs: In the Geo Protection page of IPS, click View Logs. The logs are for both the Policy for Specific Countries and for the Policy for Other Countries.
Blocking Countries Not on the List (North Korea)
As North Korea is not in the list of countries in the IPS Blade, the easiest and best way is to add a firewall object for the small network used by North Korea (175.45.176.0/22, mask 255.255.252.0, or range 175.45.176.0-175.45.179.255). Then add a firewall rule and block it.


No comments:
Post a Comment