Thursday, June 6, 2013

Steps for email transfer money

Steps for email transfer money:
如何使用银行网上的邮件转账功能进行支付
安全、快捷、便利
Step 1:
Sign on your online banking account.
打开你的银行网上账号,登录网上个人银行账户。


Step 2:
 Go to transfer/paybill option.
选择transfer或者paybill的选项。


Step 3:
Select email money/interac email money option,then click on send money.
选择email money或者interac email money选项,然后点击send money.

Step 4:
Select which account do you want to send money from and to.
选择你有从哪个账户转钱同转给谁。

收钱人/Receiver’s name: Susie
收钱人/Receiver’s email address: [email protected]


Step 5:
Setup your security question and answer.
设置你的问题和答案。(您设置的答案需要告诉我们)

Step 6:
Click on send/submit and you are done 
点击send/submit。你就成功了。

Note:
we will receive your transfer in about half an hour, then your orders  will be shipped tomorrow.
我们会在半个小时左右收到你的汇款,然后我们会在明天寄出你订购的商品。


PS:留下你详细准确的邮寄信息包括:收货人名字、地址、邮编、联系电话。谢谢配合!祝您购物愉快!
-----------------------------------------------------------------------------------------


首先,汇款人和收款人双方都要有ONLINE BANKING 这项服务哦

然后,打开TD的网站, 进入EASY WEB页面,(右上角可以看到EASYWEB字样)。

输入卡号,密码登陆进去之后,

接着在网页的左面有“TRANSFERS" 这个选项, 点击“Transfers"之后会看到“Interac Email Money Transfer" 这个选项,

 点击“Interac Email Money Transfer" ,输入收款人的名字(Eg: xiaoxiao), Email 地址(Eg: pri****@hotmail.com


输入汇款金额(整数就可以),

最后,汇款人自己设定密码就OK了。 

收款人会在30分钟左右收到你汇款的邮件, 按步骤就可以将汇款放入自己的银行了。


其他加拿大的银行卡一样用哦,并不仅限于本银行之间通行。

每次汇款最大限额1000加币/天,最小10加币。。每笔款项要收取1.5刀的手续费。

Sunday, June 2, 2013

加拿大信用卡之我见:最佳回报信用卡组合推荐


本人在加拿大待了四年多了,对于加拿大的信用卡有一些自己的想法,现和园友们分享一下。下面介绍的卡基本都是我现有和曾经有过的,大家可以参考。对于信用卡的rewards,我的benchmark是必须要高于1%回报,如果高于2%更好。

1. 申请信用卡

1)通过greatcanadianrebates申请,很多信用卡可以得到$25-$125的rebate

2)通过Amazon.ca的credit central申请,很多信用卡可以得到$15-$75的rebate

3)很多收费信用卡,在网站直接申请,也可拿到开卡积分

4)AmEx的加拿大信用卡,可以通过referral拿到比网站直接申请更高的积分(大家如有需要可以PM我,一起拿积分)

2. AmEx美国运通:

AmEx是我的最爱,他家的旅游购物相关的insurance和客服质量是口碑最好的。相对来说,AmEx可用的地方少于VISA和 MasterCard。所以在运通外还要至少备一张其他类的卡。此外,还可以在Paypal账户里面关联AmEx信用卡。这样有些只收Paypal的网站 也可以用AmEx付账得积分。 iask.ca

1)TrueEarnings: 作为Costco的member,这张卡还是可以有的。无年费。餐厅3% cash back (我去restaurant优先都用这张,麦当劳等快餐也收),加油2% cash back (也还可以),其他花费up to 1% cash back (这个不给力,不是full 1%。所以我在Costco反而都用其他的卡)。

2)SPG:这张是我现在的主力卡,花$1得1个SPG点。我对SPG点的估值在$0.02到$0.022。所以这个基本相当于2%以上回报(如果用来换 SPG的旅馆nights,就更值了)。此卡可用于Costco,$1得1点。SPG点非常灵活,可以换到其他30个航空公司的常客计划,是我知道的最多 的program。换里程时20000点以上可以得5000点bonus。通常年费$120,我是上次免年费+15000点时入的。大家再看见这种 offer一定要快上。

3)Gold Rewards:这张金卡是Charge Card,是我认为加拿大性价比最好的Travel用卡,每花$1在旅行,飞机,酒店,租车,假日package,加油,买菜,药店可得2点MR (membership rewards),其他$1得1点。我对1点MR的估值在$0.015左右。所以对于那些double rewards的项目,这张卡可得3%回报。用于Costco可得1.5%回报。MR点可1:1换成Aeroplan或BA的点(每年不时还有换点的优 惠)。年费$150(有点高),但第一年免费(大家还考虑什么),一张附卡免费,申请还可得>15000 points。

4)Platinum Card:这张卡我还没有。年费太高了($699),性价比不如Gold Rewards不适合像我这类屌丝用。其实用好了这张卡还是很值的,特别是对于经常出入多伦多机场旅行的人来说。马克波罗金卡就值一半年费了。开卡送 50000MR点(有兴趣的可以试试第一年)。我对这张卡的最大怨念是他不免Foreign Exchange Fee(美国的白金卡$450年费都免了。。。)

3. Capital One: www.iask.ca

很多新移民刚到加拿大就会经常收到C1的信用卡广告,因此对C1印象不好。但他家还是有些好卡的

1)Aspire Travel:用rewards换旅游相关支持相当于2%回报,如果选cash则是1.5%回报。开卡就可得相当于$350的travel bonus。虽然年费$120,但每年送相当于$100的点。这卡不好的地方就是想换2% travel rewards太费事了,建议数学不好的人不要考虑这张。要是直接Cash rebate,又不如Aspire Cash卡了。 家园新闻,news.iask.ca

2)Aspire Cash:直接1.5%回报。简单明了。和Aspire Travel一样,Insurance coverage非常全。亮点,无年费。建议长期持有。开卡可得$100。

3)Priority Club World:$120年费,开卡得30000优悦会point(可换成6000 Aeroplan里程)。在IHG花$1得5点(约1.5%),在其他地方消费的回报就太低了。亮点:持卡即为优悦会白金会员(优悦会的常客可以持有)。 可惜不免Foreign Exchange Fee。

4)Priority Club Platinum:无年费。开卡得15000优悦会point(可换成3000 Aeroplan里程)。第一年为优悦会金卡会员(嗯,这个实在用处不大)。

4. MBNA:MBNA的卡经常会变terms,被TD收购后,凡有变化也是变差

1)Smart Cash:当年的神卡,前半年5%买菜加油,半年后3%。不过从2013年开始,神卡风光不再,前半年仍然买菜加油5%,但半年后只有2%(还是封顶的)。基本上就是拿到卡前半年有用了。 加 拿 大 家 园 网

2)MBNA Travel Rewards:无年费,且所有卡上支出2%回报。此卡无法从MBNA网站上找到。我是去年用我的Smart Cash转的。在2012年10月6日以后也很少有人能申请到了。网站上的那个Rewards卡,通常只有1%回报,据说极少数人申请1%的卡,会拿到 2%的卡。

5. TD

1)Gold Elite:自动带有Deluxe TD Auto Club拖车服务(可在美国加拿大使用,最多拖200km,每年4次免费。配偶开车也cover)。光是这个如果从CAA或其他地方买,也要超 过$100/年。如果开的是旧车,可以申请这张卡。如果是TD的Selective Service Account 用户则免主卡和一张附卡年费。1%回报。

2)TD Cash Rewards:这张不仅是美元卡,这张还是美国的银行发行的美国信用卡。加拿大居民可以用加拿大的SIN来申请这张卡(不需要美国的SSN)。美国TD 客服有专供加拿大居民申请这张卡的申请表,地址可以只填加拿大地址。无年费,头半年加油,吃饭等5%回报,半年后1%回报。

3)First Class Travel:我没有这张卡。此卡年费$120,TD Selective Service Account 用户免主卡及一张附卡年费。用的好的话,travel相关支出可以得到4.5%回报。 家园论坛,forum.iask.ca

6. Chase:加拿大Chase有4张信用卡现在免Foreign Exchange Fee,希望其他银行能赶上。下面介绍的几张都免Foreign Exchange Fee。可申请其中一张,出国或回中国都用的上(要注意DCC)。目前加拿大除了Chase的卡外,其他信用卡都要收Foreign Exchange Fee,一般为2.5%。 iAsk.ca

1)Marriott:住万豪酒店的可以用这张。持卡可自动获得万豪礼赏银卡身份。第一年免年费(年费$120),开卡送30000 Marriott点(可换成10000 Aeroplan点)和1 Free Night (类别1-4)。以后每年送1 Free Night (类别1-5)。光这个每年的Free Night就值回年费了。在万豪消费$1可得5点。听说本身是万豪银卡及以上的member,有可能会收到开卡50000点的offer。 家园论坛,forum.iask.ca

2)Amazon:无年费。爱在加拿大Amazon网站买东西的可以用这张。Amazon加拿大网站购物2%回报,其他1%回报。

3)Sears:无年费。Sears购物2%,其他地方1%回报。这张不推荐。因为Sears的点会2年失效。

7. CIBC

1)Aventura World:我觉得比Aerogold Infinite好。年费$120,但insurance coverage多个trip cancellation。点数可1:1换成Aeroplan点。

2)Aventura:普卡,年费$39。花$1可积1点Aventura点。在积点的卡里面算年费低的。性价比不错。 加拿大家园,www.iask.ca

3)Aerogold Infinite:年费$120,积Aeroplan点。去年免第一年年费+15000点时入了一张。不过在有了AmEx Gold后,我就基本不用这张了。 www.iask.ca

8. Scotiabank:差点忘了Scotiabank了。

1)Gold AmEx:少见的AmEx以外发行的运通卡。开卡得相当于$200的旅行bonus。在买菜,加油,吃饭,娱乐用卡,可得4%回报。实在是MBNA Smart Cash之后的神卡。虽说$99的年费,但仍是物超所值,值得拥有。去年有2天,可以免第一年年费,还得$200开卡奖励。稍一犹豫,没申请上(实在是信 用卡有些多。。。),真遗憾。

2)Momentum Infinite:买菜,加油4%回报,无开卡奖励,但是是VISA卡,用的地方多。年费依然$99。

目前先介绍这些,将来再有好卡我也会更新。RBC的卡没用过(听说Target的信用卡会是RBC的,在Target购物5%回报,期待)。BMO的卡很 多是和Air Miles挂钩,不是我喜欢的。总体看,加拿大信用卡在开卡奖励,用卡积分和年费上距离美国信用卡还有一定差距,不过在这2年里可发现这个差距还是在缩小 中的。

园友们有用过的好卡也可以提出来讨论,互相提高。

总结一下常用的信用卡组合(嗯,高富帅的运通白金,黑卡就不包括了)。每个组合都包含了AmEx, Visa和MasterCard:

A. 如果只用无年费卡

1)MBNA Smart Cash:前半年买菜加油(5%),半年后只用于买菜(2%)

2)AmEx TrueEarnings:用于餐馆(3%),加油(2%)和Costco(up to 1%)

3)Chase Amazon:用于加拿大Amazon网购(2%)和非加元支出(1%)

4)Capital One Aspire Cash:用于所有其他支出(1.5%) 家 园 新 闻

B. 用有年费卡(适合于支出高,经常旅游的朋友。考虑到免去的一家人的旅游医疗险,租车险等等,年费还是合算的)

1)Scotiabank Gold AmEx:买菜,加油,吃饭,娱乐(4%)。年费$99。

2)AmEx Gold Rewards(optional):旅行相关和药店(约3%)。白金卡的回报没这个金卡高。年费$150,第一年免。

3)Chase Marriott:用于万豪酒店(约3%)及加拿大以外支出(约1%)。每年的1晚免房就可抵消年费。

4)Capital One Aspire Travel:用于所有其他支出(2%)。这个的实际年费其实才$20。

下面是2个AmEx信用卡的referral link。你用这个link申请,可以得到更多的开卡奖励,同时我也会有bonus。个人建议可以申请AmEx Gold Rewards卡,因为第一年免年费。20000点MR的价值在$200-$300。

AmEx Gold Rewards推荐申请链接(开卡可得20000点MR):

https://www.americanexpress.com/cana...&om_lid=amex11

AmEx SPG信用卡推荐申请链接(开卡可得21000 SPG点):

https://www.americanexpress.com/cana...D&om_lid=amex9

Wednesday, May 22, 2013

How to install SecurePlatform/Gaia from a USB device on Check Point appliance and Open Servers?


Solution ID:sk65205
Product:Security Gateway, Security Management
Version:NGX R65, R70, R71, R75, R76
OS:SecurePlatform, SecurePlatform 2.6, Gaia
Platform / Model:All
Date Created:06-Sep-2011
Last Modified:18-Mar-2013

ISOmorphic is the utility for creating a bootable USB device, capable of installing SecurePlatform and Gaia on Check Point appliances and Open Servers (for USB installation on IP Appliances, see sk83200).
Note: To view the list of USB flash keys that are known to work with ISOmorphic, see sk92423.
To use ISOmorphic, perform the following steps:
A. Prepare the USB device
1. Make sure you have the SecurePlatform/Gaia ISO file corresponding to the appliance model you need to install and the relevant release.
Note: Installing from VSX NGX R67.10 ISO is not supported using ISOmorphic.
2. Run the ISOmorphic tool (download here)
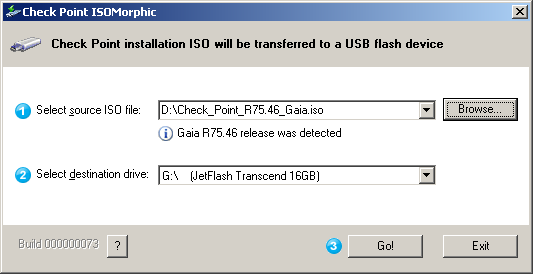
ISOmorphic Settings
3. Choose the Source SecurePlatform/Gaia ISO file
4. Choose the destination drive
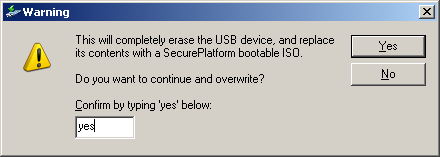
5. Press the "Go!" button. A warning message will appear
ISOmorphic confirmation screen
Note: all data on the USB device will be erased.
6. Verify your selections. Write "yes" in the new warning window to confirm the USB drive formatting.
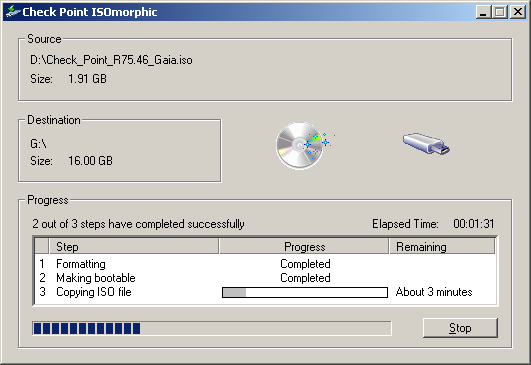
The USB drive is being prepared. A window that displays the progress is displayed
ISOmorphic progress screen
Wait until the steps are completed.
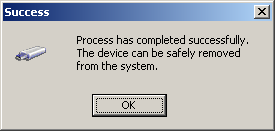
ISOmorphic success
Now you may remove the USB drive.
The USB is now ready for the installation
B. Install the Appliance/Open Server
1. Connect the USB device to the machine
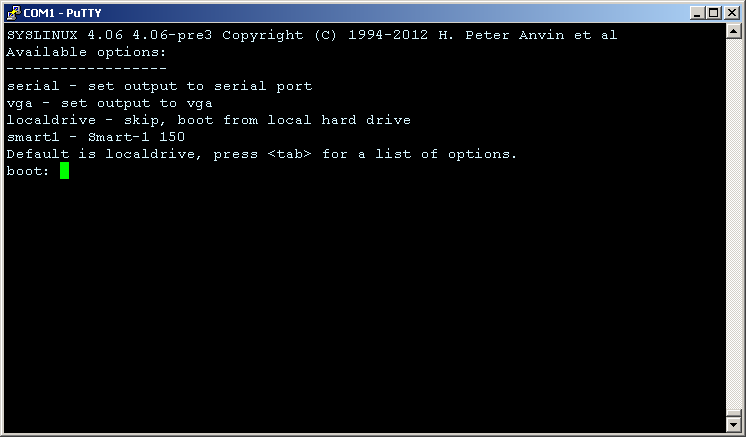
2. Turn on the machine. Once booted successfully via the USB drive, syslinux window will appear.
Note: If the machine did not boot from the USB device check the BIOS settings.
Syslinux screen
You should type the boot option according to the connection type you are using:
vga - for VGA or other graphic mode connection
serial - for serial connection (e.g. console connection on Appliances)
The "smart1" option is for installing Smart-1 150 Appliance
Note: If no option is typed, after 90 seconds the installation will be aborted and the machine will boot from the local drive.
2. The installation process starts and continues the same way as CDROM installation.
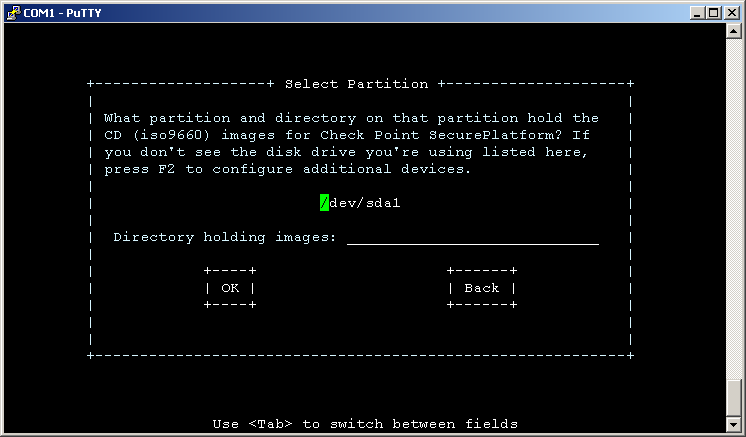
Note: On some of SecurePlatform versions the system needs to know from which partition to load the SecurePlatform image.
Partition select
Usually you should select the last option on the list


    Note:
    The following message might appear on the screen during installation:
    find: /tmp/hdimage/Name_Of_ISO_Image.iso: Value too large for defined data type

    Example:
    find: /tmp/hdimage/Check_Point_R75.20_Appliance.iso: Value too large for defined data type

    Root cause:
    Busybox that is used for SecurePlatform installation from USB Storage was not compiled with 64bit file-offsets (_FILE_OFFSET_BITS=64). The ramdisk on the USB Storage mounts the ISO image, and then mounts 'stage2.img' from the ISO image, afterwards it unmounts the ISO image, and 'stage2.img' remounts the ISO. When 'stage2.img' is running, 'find' command complains when it sees an ISO file bigger than 2 GB.

    Clarification:
    This message can be safely ignored. The installation completes successfully, and installed software works correctly.
    Busybox with 64bit file-offset support was integrated into:
    • VSX NGX R67.10
    • future Gaia OS release

    Remember:
    • ISOmorphic can be used for fresh install only.
    • ISOmorphic is provided as a utility to ease installation.
    • Customers can use any tool they want to format their flash keys. Check Point does not enforce the usage of ISOmorphic.

    Friday, May 17, 2013

    Secure IOS Template Version 6.4 04 APR 2013

    http://www.cymru.com/Documents/secure-ios-template.html

    Secure IOS Template Version 6.4 04 APR 2013

    By Team Cymru, noc at cymru.com

    Documents ]       [ Home ]

    Introduction

    One of the challenges of any network is how to mitigate, if not deny, the various attacks launched daily on the Internet. While blocking the script kiddies and their attempts to gain root or scan a subnet is one challenge, a greater challenge has been to mitigate the DDoS attacks. While nothing is foolproof, layers of protection can be applied to the problem.
    Taking a holistic view of the challenge led to the creation of the layered approach. In this approach, the following philosophies are applied:

    1. The border router provides for protocol protection and defends itself and the firewall.
    2. The firewall provides port protection and defends itself and the host residing behind it.
    3. The end stations are configured to survive various DOS attacks as well as to reduce the number of noxious services which might be exploited.
    This results in the "funnel effect," wherein progressively less nasty traffic comes through the overall pipe. The network is "crunchy through and through," not just at the edges.
    A brief aside - If you are interested in tuning your UNIX systems to provide additional defense against myriad attack types, please peruse my UNIX IP Stack Tuning Guide.
    The purpose of this document is to introduce the first wall of defense, the router. The attached template provides a work in progress towards the goal of a secure border device. This template does not cover router or routing protocol basics, and only lightly touches on the topic of router performance tuning (e.g. using the loopback device instead of the null device for black hole routes). For more on router performance tuning tips, please see my Cisco Router Performance Tuning document.
    As an added bonus, George Jones has written a tool, NCAT, that will validate Cisco router configurations. Using a template configuration, NCAT will ensure that any router configuration adheres to the policies in the template. I highly recommend this tool. You will find it at ncat.sourceforge.net.
    We no longer list the bogons in this template, so please look for detailed bogon insight on our Bogon List.
    Barry Greene and Philip Smith, both formerly of Cisco, have published a book entitled Cisco ISP Essentials. This is an excellent collection of clue. You can learn more about it at www.ispbook.com.
    Cisco maintains a nice collection of security documents here.

    Credits

    I truly appreciate the suggestions, bug reports, and thoughtful discourse provided by these folks. Thank you!

    Bruce Babcock
    Alison Gudgeon
    Paul Jacobs
    Deepak Jain
    George Jones
    Christian Koch
    Mark Kent
    Thomas Kernen
    John Kristoff
    Christopher Morrow
    Hank Nussbacher
    Johan van Reijenda
    Ken Reiss
    Rafi Sadowsky
    Steve Snodgrass
    Alfredo Sola
    David Wolsefer
    And, of course, the FIRST community.

    Overview

    The Cisco Secure IOS Configuration Template is simply a template, or a starting point. Individual sites will need to modify the template to varying degrees. For example, the template does not include any routing protocol information. This would make the template far too large and specific. Although one could argue that a BGP configuration would meet the needs of a great many border routers, it was decided to shelve that piece for another template. You may wish to peruse my Secure Cisco BGP Configuration Template to assist you in securing your BGP configuration. As with all templates, your mileage may vary.
    The template has undergone a trial by fire, protecting various sites. In one case, a modified version of this template protects a site that endures upwards of 10000 attacks per day. The template has weathered the storm well, although not without some real time modification. As the instruments and methods of the malcontents change, so do the attack styles. However, this template has yet to fail, and the sites behind it have remained on-line throughout attacks of moderate to great intensity.
    Clearly, hardware counts. A 2501 with this template will not provide much in the way of protection, and certain features of this template will not work on the lower tier of Cisco routing products. The template was written with a Cisco 7000 or greater model in mind.
    This template is not a panacea. It will not stop all attack types. It is simply a part of a larger design. Remember the layered approach.


    Decisions, Decisions

    As noted, the template must be modified to fit the environment. Obviously such things as IP addresses and routes must be changed. How ever, there are other decisions to be made. The IP address of the FTP, TACACS+, and syslog servers must be noted, for example.
    Enabling the anti-spoofing feature of CEF (reverse-path) is another thorny issue for those with the potential for asymmetric data flows. In this case, ACLs should be used for anti-spoofing protection. Both options are provided in the template.
    Determining the proper CAR limits for multicast, ICMP, and UDP is quite site specific. While some defaults have been placed in the configuration, it is best to size the pipe and modify the limits accordingly. It is difficult to model a situation where ICMP should be allowed more than 575Kb/s of bandwidth, however your mileage may vary.


    Caveats

    As with all things, test test test. Do not deploy a configuration without thoroughly testing it in a non-production environment. If you do not understand the commands or the accompanying comments, do not utilize them. You may find yourself in a sticky debugging session at some point, so complete understanding of the configuration is highly recommended.
    This template WILL NOT WORK without modification to suit your gear and topology!

    Question, Comments, Suggestions

    This is a work in progress, and feedback from those who use the template, have their own bag of tricks, or endure malicious attacks is most welcome! If you have questions, I will do my best to answer them and assist you. Please route all commentary and questions to [email protected].
    I hope you find this helpful in your effort to fend off the Internet vandals!


    Template

    The commands are in BOLD text so that they stand out from the surrounding comments.
    ! Secure router configuration template.
    ! Version 6.4
    ! @(#)Secure IOS template v6.4 04 APR 2013 Team Cymru [email protected]
    ! @(#)https://www.cymru.com/Documents/secure-ios-template-64.html
    !
    ! This configuration assumes the following topology:
    !
    Upstream/Internet
    ! 192.0.2.1/28
    !       |
    ! 192.0.2.14/28 (Ethernet 2/0)
    THIS ROUTER
    ! 192.0.2.17/28 (Ethernet 2/1)
    !       |
    ! 192.0.2.30/28
    Firewall
    ! 192.0.2.33/27
    !       |
    ! 192.0.2.32/27
    Intranet
    !
    ! In this case, 192.0.2.34 is the loghost, FTP server, etc.
    ! for the router. It could also be the firewall if
    ! circumstances dictate.
    !
    service nagleservice tcp-keepalives-inservice tcp-keepalives-out!
    ! Show copious timestamps in our logs
    service timestamps debug datetime msec show-timezone localtimeservice timestamps log datetime msec show-timezone localtime! Ensures all passwords and secrets are obfuscated when looking at
    ! configuration files
    service password-encryptionno service dhcp!
    hostname secure-router01!
    boot system flash slot0:rsp-pv-mz.121-5a.binlogging buffered 16384 debuggingno logging console! The keyword 'secret' ensures MD5 is used when 'service password
    ! encryption' is used (above.) The keyword 'password' uses a mechanism
    ! which is simple to reverse-engineer and should be avoided
    enable secret <PASSWORD>no enable password!
    ! Use TACACS+ for AAA. Ensure that the local account is
    ! case-sensitive, thus making brute-force attacks less
    ! effective.
    aaa new-modelaaa authentication login default group tacacs+ local-caseaaa authentication enable default group tacacs+ enableaaa authorization commands 15 default group tacacs+ localaaa accounting exec default stop-only group tacacs+aaa accounting commands 15 default stop-only group tacacs+aaa accounting network default stop-only group tacacs+tacacs-server host 192.0.2.34tacacs-server key cheezit!
    ! In the event that TACACS+ fails, use case-sensitve local
    ! authentication instead. Keeps the hackers guessing, and
    ! the router more secure.
    username <USERNAME> secret <PASSWORD>!
    ! Logging the commands run while at enable level access is
    ! a great way to track mistakes, security issues, etc.
    archive
     log config
      logging enable
      logging size 500
      notify syslog
      hidekeys
    !
    ! Ensure TCL doesn't use an initilizaion file where available. This won't show up in the
    ! config. It will break your router-based TCL scripts if
    ! if you use such, so use with care!
    no scripting tcl init
    no scripting tcl encdir
    !
    ! Enable the netflow top talkers feature.
    ! You can see the top N talkers (50 in this example) with the
    show ip flow top-talkers command. This is a handy
    ! utility to use during DDoS attacks and traffic issues. You
    ! can sort-by either packets or bytes, as you prefer.
    ip flow-top-talkers
     top 50
     sort-by packets
    !
    ! Don't run the HTTP server.
    no ip http serverno ip http secure-server!
    ! Allow us to use the low subnet and go classless
    ip subnet-zeroip classless!
    ! Disable noxious services
    no service padno ip source-routeno ip fingerno ip bootp serverno ip domain-lookup!
    ! Block brute force login attempts while maintaining access for legitimate source addresses.
    http://www.cisco.com/en/US/docs/ios/sec_user_services/configuration/guide/sec_login_enhance_ps6922_TSD_Products_Configuration_Guide_Chapter.html
    ! This is in theory unnecessary if VTY ACLs are in place, yet things happen and this adds the
    ! "belt" to the VTY ACL "suspenders."
    ! Note carefully the use of ACL 100 in the login quiet-mode statement. This ensures our
    ! legitimate administrator addresses can still reach the router even after a vigorous
    ! bruteforce or attack attempt.
    login block-for 100 attempts 15 within 100login quiet-mode access-class 100login on-failure loglogin on-success log!
    ! Catch crash dumps; very important with a "security router."
    ip ftp username rooterip ftp password <PASSWORD>! Give our core dump files a unique name.
    exception core-file secure-router01-coreexception protocol ftpexception dump 192.0.2.34!
    ! Fire up CEF for both performance and security.
    ip cef!
    ! Set the timezone properly. It is best to standardize on one
    ! timezone for all routers, thus making problem tracking easier.
    clock timezone GMT 0! Synchronize our clocks with a local (trusted and authenticated)
    ! NTP server. The SECRETKEY must be the same on both the router
    ! and the NTP server.
    ntp authentication-key 6767 md5 <SECRETKEY>ntp authenticatentp update-calendarntp server 192.0.2.34!
    ! Configure the loopback0 interface as the source of our log
    ! messages. This is often used for routing protocols as well.
    ! Select an IP address that uniquely identifies this router.
    ! One trick is to allocate a netblock for use as the router
    ! loopback netblock.
    int loopback0 ip address 10.10.10.10 255.255.255.255 no ip redirects no ip unreachables no ip proxy-arp!
    ! Configure null0 as a place to send naughty packets. This
    ! becomes the "roach motel" for packets -- they can route in,
    ! but they can't route out.
    interface null0 no ip unreachables!
    interface Ethernet2/0 description Unprotected interface, facing towards Internet ip address 192.0.2.14 255.255.255.240 ! Do we run CEF verify? Yes if the data path is symmetric. No
     ! if the data path is asymmetric.
     ip verify unicast reverse-path ! Apply our template ACL
     ip access-group 2010 in ! Allow UDP to occupy no more than 2 Mb/s of the pipe.
     rate-limit input access-group 150 2010000 250000 250000 conform-action transmit exceed-action drop ! Allow ICMP to occupy no more than 500 Kb/s of the pipe.
     rate-limit input access-group 160 500000 62500 62500 conform-action transmit exceed-action drop ! Allow multicast to occupy no more than 5 Mb/s of the pipe.
     rate-limit input access-group 170 5000000 375000 375000 conform-action transmit exceed-action drop ! Don't send redirects.
     no ip redirects ! Don't send unreachables.
     ! NOTE WELL that this may break PMTU discovery.
     ! For example, if this router is edge for a VPN of any sort, you might need
     ! to enable ip unreachables
     ! A typical symptom is ping working but a larger transmission doesn't.
     no ip unreachables ! Don't propogate smurf attacks.
     no ip directed-broadcast ! Don't pretend to be something you're not. :-)
     no ip proxy-arp ! Do not reveal our netmask
     no ip mask-reply ! Log all naughty business.
     ip accounting access-violations ! If you allow multicast in your network or participate in the
     ! MBONE, the following multicast filtering steps will help to
     ! ensure a secure multicast environment. These must be applied
     ! per interface.
     ip multicast boundary 30 !
     ! Keep flow data for analysis. If possible, export it to a
     ! cflowd server.
     ip route-cache flow!
    interface Ethernet2/1 description Protected interface, facing towards DMZ ip address 192.0.2.17 255.255.255.240 ! Do we run CEF verify? Yes if the data path is symmetric. No
     ! if the data path is asymmetric.
     ip verify unicast reverse-path ! If we are using RPF, comment out the ACL below.
     ip access-group 115 in no ip redirects no ip unreachables no ip directed-broadcast no ip proxy-arp ip accounting access-violations ip multicast boundary 30 no ip mask-reply ip route-cache flow!
    ! Default route to the Internet (could be a routing
    ! protocol instead)
    ip route 0.0.0.0 0.0.0.0 192.0.2.1! Route to network on the other side of the firewall
    ip route 192.0.2.32 255.255.255.224 192.0.2.30! Black hole routes. Do not combine this with TCP Intercept;
    ! in fact, don't use TCP Intercept at all.
    !
    ! Bogons
    ! Team Cymru has removed all static bogon references from this template
    ! due to the high probability that the application of these bogon filters
    ! will be a one-time event. Unfortunately many of these templates are
    ! applied and never re-visited, despite our dire warnings that bogons do
    ! change.
    !
    ! This doesn't mean bogon filtering can't be accomplished in an automated
    ! manner. Why not consider peering with our globally distributed bogon
    ! route-server project? Alternately you can obtain a current and well
    ! maintained bogon feed from our DNS and RADb services. Read more at the
    ! link below to learn how!
    !
    https://www.team-cymru.org/Services/Bogons/
    !
    ! Export our NetFlow data to our NetFlow server, 192.0.2.34. NetFlow
    ! provides some statistics that can be of use when tracing the true
    ! source of a spoofed attack.
    ip flow-export source loopback0ip flow-export destination 192.0.2.34 2055ip flow-export version 5 origin-as!
    ! Log anything interesting to the loghost. Capture all of
    ! the logging output with FACILITY LOCAL5.
    logging trap debugginglogging facility local5logging source-interface loopback0logging 192.0.2.34!
    ! With the ACLs, it is important to log the naughty folks.
    ! Thus, the implicit drop all ACL is replaced (augmented,
    ! actually) with an explicit drop all that logs the attempt.
    ! You may wish to keep a second list (e.g. 2011) that does not
    ! log. During an attack, the additional logging can impact the
    ! performance of the router. Simply copy and paste access-list 2010,
    ! remove the log-input keyword, and name it access-list 2011. Then
    ! when an attack rages, you can replace access-list 2010 on the
    ! Internet-facing interface with access-list 2011.
    !
    ! Block SNMP access to all but the loghost
    access-list 20 remark SNMP ACLaccess-list 20 permit 192.0.2.34access-list 20 deny any log!
    ! Multicast - filter out obviously naughty or needless traffic
    access-list 30 remark Multicast filtering ACL! Link local
    access-list 30 deny 224.0.0.0 0.0.0.255 log! Locally scoped
    access-list 30 deny 239.0.0.0 0.255.255.255 log! sgi-dogfight
    access-list 30 deny host 224.0.1.2 log! rwhod
    access-list 30 deny host 224.0.1.3 log! ms-srvloc
    access-list 30 deny host 224.0.1.22 log! ms-ds
    access-list 30 deny host 224.0.1.24 log! ms-servloc-da
    access-list 30 deny host 224.0.1.35 log! hp-device-disc
    access-list 30 deny host 224.0.1.60 log! Permit all other multicast traffic
    access-list 30 permit 224.0.0.0 15.255.255.255 log!
    ! Block access to all but the loghost and the firewall, and log any
    ! denied access attempts. This also serves to create an audit trail
    ! of all access to the router. Extended ACLs are used to log some
    ! additional data.
    access-list 100 remark VTY Access ACLaccess-list 100 permit tcp host 192.0.2.34 host 0.0.0.0 range 22 23 log-inputaccess-list 100 permit tcp host 192.0.2.30 host 0.0.0.0 range 22 23 log-inputaccess-list 100 deny ip any any log-input!
    ! Leave one VTY safe for access, just in case. The host
    ! 192.0.2.40 is a secure host in the NOC. If all the VTYs are
    ! occupied, this leaves one VTY available.
    access-list 105 remark VTY Access ACLaccess-list 105 permit tcp host 192.0.2.40 host 0.0.0.0 range 22 23 log-inputaccess-list 105 deny ip any any log-input!
    ! Configure an ACL that prevents spoofing from within our network.
    ! This ACL assumes that we need to access the Internet only from the
    ! 192.0.2.32/27 network. If you have additional networks behind
    ! 192.0.2.32/27, then add them into this ACL.
    access-list 115 remark Anti-spoofing ACL! First, allow our intranet to access the Internet.
    access-list 115 permit ip 192.0.2.32 0.0.0.31 any! Second, allow our firewall to access the Internet. This is useful
    ! for testing.
    access-list 115 permit ip host 192.0.2.30 any! Now log all other such attempts.
    access-list 115 deny ip any any log-input!
    ! Rate limit (CAR) ACLs for UDP, ICMP, and multicast.
    access-list 150 remark CAR-UDP ACLaccess-list 150 permit udp any anyaccess-list 160 remark CAR-ICMP ACLaccess-list 160 permit icmp any anyaccess-list 170 remark CAR-Multicast ACLaccess-list 170 permit ip any 224.0.0.0 15.255.255.255!
    ! Deny any packets from the RFC 1918, IANA reserved, test,
    ! multicast as a source, and loopback netblocks to block
    ! attacks from commonly spoofed IP addresses.
    access-list 2010 remark Anti-bogon ACL! Claims it came from the inside network, yet arrives on the
    ! outside (read: Internet) interface. Do not use this if CEF
    ! has been configured to take care of spoofing.
    ! access-list 2010 deny ip 192.0.2.16 0.0.0.15 any log-input! access-list 2010 deny ip 192.0.2.32 0.0.0.31 any log-input!
    ! Bogons
    ! Team Cymru has removed all static bogon references from this template
    ! due to the high probability that the application of these bogon filters
    ! will be a one-time event. Unfortunately many of these templates are
    ! applied and never re-visited, despite our dire warnings that bogons do
    ! change.
    !
    ! This doesn't mean bogon filtering can't be accomplished in an automated
    ! manner. Why not consider peering with our globally distributed bogon
    ! route-server project? Alternately you can obtain a current and well
    ! maintained bogon feed from our DNS and RADb services. Read more at the
    ! link below to learn how!
    !
    https://www.team-cymru.org/Services/Bogons/
    !
    ! Drop all ICMP fragments
    access-list 2010 deny icmp any any fragments log-input! Allow IP access to the intranet (firewall filters specific ports)
    access-list 2010 permit ip any 192.0.2.32 0.0.0.31! Allow multicast to enter. See also access-list 30 for more
    ! specific multicast rules.
    access-list 2010 permit ip any 224.0.0.0 15.255.255.255! Our explicit (read: logged) drop all rule
    access-list 2010 deny ip any any log-input!
    ! Do not share CDP information, which contains key bits about our
    ! configuration, etc. This command disabled CDP globally. If you
    ! require CDP on an interface, use cdp run and disable cdp
    ! (no cdp enable) on the Internet-facing interface.
    no cdp run! SNMP is VERY important, particularly with MRTG.
    ! Treat the COMMUNITY string as a password - keep it difficult to guess.
    snmp-server community <COMMUNITY> RO 20!
    ! Introduce ourselves with an appropriately stern banner.
    banner motd %Router foo. Access to this device or the attachednetworks is prohibited without express written permission.Violators will be prosecuted to the fullest extent of both civiland criminal law.
    We don't like you. Go away.
    %!
    line con 0 exec-timeout 15 0 transport input noneline aux 0 exec-timeout 15 0line vty 0 3 access-class 100 in exec-timeout 15 0! Enable SSH connectivity.
    ! Obviously, you must have an IOS image that supports SSH, and don't
    ! forget to generate the key with crypto key generate rsa.
     transport input sshline vty 4 access-class 105 in exec-timeout 15 0 transport input ssh!
    ! End of the configuration.
    !


    Change Log

    Changes in version 6.4:
    • Removed telnet references
    • Added comment for service password-encryption
    • Added comments for use of secret instead of password
    Changes in version 6.3:
    • Added Login Block feature.
    • Cleaned up links, naming scheme, addresses.
    Changes in version 6.2:
    • Converted sample addresses to TEST-NET to make this doc RFC 3330-compliant.
    • Added Login Block feature.
    Changes in version 6.1:
    • Removed static bogon filters.
    Changes in version 6.0:
    • 109/8 and 178/8 allocated to RIPE (JAN 2009). Removed from the bogon filters.
    Changes in version 5.10:
    • 108/8 and 184/8 allocated to ARIN (Dec 2008). Removed from the bogon filters.
    Changes in version 5.9:
    • 110/8 and 111/8 allocated to APNIC (Nov 2008). Removed from the bogon filters.
    Changes in version 5.8:
    • Added in 198.18.0.0/15 added into the access-list and blackhole networks.
    Changes in version 5.7:
    • 110/8 and 111/8 allocated to APNIC (NOV 2008). Removed from the bogon filters.
    Changes in version 5.6:
    • 197/8 allocated to AFRINIC (OCT 2008). Removed from the bogon filters.
    Changes in version 5.5:
    • 112/8 and 113/8 allocated to APNIC (MAY 2008). Removed from the bogon filters.
    Changes in version 5.4:
    • Changed TCL wording.
    Changes in version 5.3:
    • 173/8 and 174/8 allocated to ARIN (FEB 2008). Removed from the bogon filters.
    Changes in version 5.2:
    • 14/8 changed to IANA Reserved (JAN 2008). Added to the bogon filters.
    Changes in version 5.1:
    • 114/8 and 115/8 allocated to APNIC (OCT 2007). Removed from the bogon filters.
    Changes in version 5.0:
    • 186/8 and 187/8 allocated to LACNIC (SEP 2007). Removed from the bogon filters.
    Changes in version 4.9:
    • Disabled TCL.
    • Added access and enable command logging.
    • Added the Netflow top talkers feature.
    Changes in version 4.8:
    • 94/8 and 95/8 allocated to RIPE (JUL 2007). Removed from the bogon filters.
    Changes in version 4.7:
    • 46/8 re-listed as IANA Reserved (APR 2007). Added to the bogon filters. 7/8 removed from bogon filters due to dispute in allocation status.
    Changes in version 4.6:
    • 92/8 and 93/8 allocated to RIPE (MAR 2007). Removed from the bogon filters.
    Changes in version 4.5:
    • 116/8, 117/8, 118/8, 119/8 and 120/8 allocated to APNIC (JAN 2007). Removed from the bogon filters.
    Changes in version 4.4:
    • 96/8, 97/8, 98/8 and 99/8 allocated to ARIN (OCT 2006). Removed from the bogon filters.
    Changes in version 4.3:
    • 77/8, 78/8 and 79/8 allocated to RIPE (AUG 2006). Removed from the bogon filters.
    Changes in version 4.2:
    • 121/8, 122/8 and 123/8 allocated to APNIC (JAN 2006). Removed from the bogon filters.
    Changes in version 4.1:
    • 89/8, 90/8 and 91/8 allocated to RIPE (JUN 2005). Removed from the bogon filters.
    Changes in version 4.0:
    • 74/8, 75/8 and 76/8 allocated to ARIN (JUN 2005). Removed from the bogon filters.
    • 189/8 and 190/8 allocated to LACNIC (JUN 2005). Removed from the bogon filters.
    Changes in version 3.9:
    • 41/8 allocated to AfriNIC (APR 2005). Removed from the bogon filters.
    Changes in version 3.8:
    • 73/8 allocated to ARIN (MAR 2005). Removed from the bogon filters.
    Changes in version 3.7:
    • 124/8, 125/8 and 126/8 allocated to APNIC (JAN 2005). Removed from the bogon filters.
    Changes in version 3.6:
    • 71/8 and 72/8 allocated to ARIN (AUG 2004). Removed from the bogon filters.
    Changes in version 3.5:
    • 58/8 and 59/8 allocated to the APNIC (APR 2004). Removed from the bogon filters.
    • Removed TCP Intercept, a feature best left disabled on all routers.
    Changes in version 3.4:
    • 85/8, 86/8, 87/8, and 88/8 allocated to the RIPE NCC (APR 2004). Removed from the bogon filters.
    Changes in version 3.3:
    • Removed 70/8 (allocated to ARIN JAN 2004) from the bogon filters.
    Changes in version 3.1:
    • Removed 83/8 and 84/8 (allocated to RIPE NCC NOV 2003) from the bogon filters.
    Changes in version 3.0:
    • APNIC returned the 223/8 allocation to IANA and received the 60/8 allocation in its place on 07 April 2003.
    Changes in version 2.9:
    • Added the following netblocks to the bogon filters, designated as RESERVED by IANA on 04 April 2003:
      173/8   Apr 03   IANA - Reserved
      174/8 Apr 03 IANA - Reserved
      175/8 Apr 03 IANA - Reserved
      176/8 Apr 03 IANA - Reserved
      177/8 Apr 03 IANA - Reserved
      178/8 Apr 03 IANA - Reserved
      179/8 Apr 03 IANA - Reserved
      180/8 Apr 03 IANA - Reserved
      181/8 Apr 03 IANA - Reserved
      182/8 Apr 03 IANA - Reserved
      183/8 Apr 03 IANA - Reserved
      184/8 Apr 03 IANA - Reserved
      185/8 Apr 03 IANA - Reserved
      186/8 Apr 03 IANA - Reserved
      187/8 Apr 03 IANA - Reserved
      189/8 Apr 03 IANA - Reserved
      190/8 Apr 03 IANA - Reserved
    Changes in version 2.8:
    • Removed 201/8 (allocated to LACNIC APR 2003) from the bogon filters.
    Changes in version 2.7:
    • Removed 222/8 and 223/8 (allocated to APNIC FEB 2003) from the bogon filters.
    Changes in version 2.6:
    • Removed 82/8 (allocated to RIPE NOV 2002) from the bogon filters.
    Changes in version 2.5:
    • Removed 69/8 (allocated to ARIN AUG 2002) from the bogon filters.
    Changes in version 2.3:
    • Added additional bogon filters to the black hole route list.
    • Added additional bogon filters to the ACLs.
    Changes on 22 JUN 2001 (version 2.3.1):
    • Removed 67/8 and 68/8 from the "bogon" ACLs. These netblocks will be allocated by ARIN (on /20 boundaries) as of 22 June 2001.
    Changes on 16 OCT 2001 (version 2.3.2):
    • Removed 219/8 from the "bogon" ACLs. This netblock will be allocated by APNIC as of 17 October 2001.
    Changes in version 2.4:
    • Removed 221/8 from the ACL and black hole route list. This netblock has been allocated to APNIC as of JUL 2002.

    Monday, May 13, 2013

    SNMP v3 Concept


    SNMPv3 protocol a security model, defining new concepts to replace the old community-based pseudo-authentication and provide communication privacy by means of encryption. The new concepts are: usergroupand security level. A group defines the access policy for a set of users. An access policy defines which SNMP objects can be accessed for reading and writing or which SNMP objects can generate notifications to the members of a group. Policy is defined by associating the respective read, write or notify view with a group. By using a notify view, a group determines the list of notifications its users can receive. A group also defines the security modeland security level for its users.
    Essentially, all groups form a table, which maps users to their read/write/notify views and security models. Note that if a group is defined without a read view than all objects are available to read. Contrary to that, if no write or notify view is defined, no write access is granted and no objects can send notifications to members of the group. The notify view is usually not configured manually. Rather, it’s added by the snmp-server host command automatically, when a users in a group is bound to a notification target host. Note that SNMP will use the username configured with snmp-server host along with the security model specified to authenticate and possibly encrypt the notifications. If the security model is set to «noauth» then a plain username is sent in a manner resembling the old community string.
    The following security models exist: SNMPv1, SNMPv2, SNMPv3. The following security levels exits: “noAuthNoPriv” (no authentiation and no encryption – noauth keyword in CLI), “AuthNoPriv” (messages are authenticated but not encrypted – auth keyword in CLI), “AuthPriv” (messages are authenticated and encrypted – priv keyword in CLI). SNMPv1 and SNMPv2 models only support the “noAuthNoPriv” model since they use plain community string to match the incoming packets. The SNMPv3 implementations could be configured to use either of the models on per-group basis (in case if “noAuthNoPriv” is configured, username serves as a replacement for community string). All users sharing a group utilize the same security model, however, the specific model settings (password, encryption key) are sep per-user. Note that SNMPv3 does not send passwords in clear-text and uses hash-based authentication with either MD5 or SHA1 functions (HMAC authentication – the packet conted is hashed along with authentication key to produce the authentication string). For encryption, statically configured keys are used along with DES56 symmetric cipher (that mean the same key should be configured on NMS for the particular user).
    Consider the example below. Three groups are created. Groups «NORMAL» and «RESTRICTED» are used to control remote users access and group «TRAP» is used to send notifications. Note that only read-view is specified for group “RESTRICTED” and it’s limited to IfEntry fields for a fixed interface index. The group «RESTRICTED» has an access-list applied to control the NMS stations the users can access from. Note that the groups have different security levels. Next, three users are created, one for each group respectively, with their authentication and encryption keys. Finally, SNMP link up and down notifications are enabled and SNMP trap destination host is configured. This operation automatically creates and assigns the «notify» view for the respective group (will appear in show commands output below).
    !
    ! Access-List to control users in the RESTRICTED group.
    !
    access-list 99 permit 155.1.146.0 0.0.0.255

    !
    ! Set ifIndexes persistent, for view definition is based on IfIndexes
    !
    snmp-server ifindex persist

    !
    ! The first view covers the “ISO” sub-branch and the second one covers
    ! all “lifEntry” fields for interface with IfIndex 3 (Serial 0/0).
    !
    snmp-server view NORMAL iso included
    snmp-server view RESTRICTED ifEntry.*.3 included

    !
    ! Define three groups. The first one allows to read and write
    ! into a large portion of the MIB tree. The second one allows reading
    ! just information specific to Serial 0/0 interface, and limits user
    ! access based on access-list
    !
    ! The third group is for sending traps. A user belonging to this group
    ! will be utilized to send trap messages. Its name and password
    ! will be used to create authentication credentials in a trap message
    ! and the users privacy password will be used to encrypt the packet.
    ! Note that this group has NO notify view defined, which is done on
    ! on purpose. The notify view will be automatically populated when
    ! notification hosts are configured and bound to users
    !

    snmp-server group NORMAL v3 priv read NORMAL write NORMAL
    snmp-server group RESTRICTED v3 auth read RESTRICTED access 99
    snmp-server group TRAP v3 priv

    !
    ! Users, their passwords and encryption keys are defined now
    !
    snmp-server user NORMAL NORMAL v3 auth sha CISCO priv des56 CISCO
    snmp-server user RESTRICTED RESTRICTED v3 auth sha CISCO
    snmp-server user TRAP TRAP v3 auth sha CISCO priv des56 CISCO

    !
    ! Allow sending traps and configure a destination host. Note that when
    ! a host is configured and bound to SNMPv3 username, the corresponding
    ! group notify view is populated based on traps allowed for this
    ! particular destination. This is why it’s not required to configure
    ! the notify view for a group.
    !
    snmp-server enable traps snmp linkup linkdown
    snmp-server host 155.1.146.100 traps version 3 priv TRAP
    Perform some basic verifications next using the show commands. Note that SNMPv3 users do not appear in the running configuration for security reason (different management channel) but you can see some information usingshow snmp users command. Also, pay attention to the automatic view assigned to the “TRAP” group.
    Rack1R6#show snmp user 

    User name: TRAP
    Engine ID: 80000009030000119221DA80
    storage-type: nonvolatile active
    Authentication Protocol: SHA
    Privacy Protocol: DES
    Group-name: TRAP

    User name: NORMAL
    Engine ID: 80000009030000119221DA80
    storage-type: nonvolatile active
    Authentication Protocol: SHA
    Privacy Protocol: DES
    Group-name: NORMAL

    User name: RESTRICTED
    Engine ID: 80000009030000119221DA80
    storage-type: nonvolatile active
    Authentication Protocol: SHA
    Privacy Protocol: None
    Group-name: RESTRICTED

    Rack1R6#show snmp group
    groupname: ILMI security model:v1
    readview : *ilmi writeview: *ilmi
    notifyview:
    row status: active

    groupname: ILMI security model:v2c
    readview : *ilmi writeview: *ilmi
    notifyview:
    row status: active

    groupname: TRAP security model:v3 noauth
    readview : writeview:
    notifyview: *tv.FFFFFFFF.FFFFFFFF.FFFFFFFF0F
    row status: active

    groupname: TRAP security model:v3 priv
    readview : v1default writeview:
    notifyview:
    row status: active

    groupname: NORMAL security model:v3 priv
    readview : NORMAL writeview: NORMAL
    notifyview:
    row status: active

    groupname: RESTRICTED security model:v3 auth
    readview : RESTRICTED writeview:
    notifyview:
    row status: active access-list: 99

    Rack1R6#show snmp view
    *ilmi system - included permanent active
    *ilmi atmForumUni - included permanent active
    NORMAL iso - included nonvolatile active
    v1default iso - included permanent active
    v1default internet.6.3.15 - excluded permanent active
    v1default internet.6.3.16 - excluded permanent active
    v1default internet.6.3.18 - excluded permanent active
    v1default ciscoMgmt.394 - excluded permanent active
    v1default ciscoMgmt.395 - excluded permanent active
    v1default ciscoMgmt.399 - excluded permanent active
    v1default ciscoMgmt.400 - excluded permanent active
    RESTRICTED ifEntry.0.3 FF:EF included nonvolatile active
    *tv.FFFFFFFF.FFFFFFFF.FFFFFFFF0F iso.2.840.10036 - included volatile active
    *tv.FFFFFFFF.FFFFFFFF.FFFFFFFF0F internet - included volatile active
    ==========================================================================================


    Cisco Router SNMPv3 Configuration Sample & Guide


    !!!!SNMP access control to only allow desired hosts!!!!!
    ip access-list standard snmp-allow
    permit 10.214.102.0 0.0.0.255
    permit 172.16.202.0 0.0.0.7
    !
    !
    !!!!!! First you’d need to create a view!!!!!
    !A read or write view can be !configured with desired MIB access.  Then, such views are assigned
    !to snmpv3 grops. Below is a read only view that start from the
    ! root, ‘iso’, but excludes snmpUsmMIB, snmpVacmMIB, !snmpCommuityMIB for enhance security.  These MIB are
    !explained below.
    !
    snmp-server view ReadView-All iso included
    !!!!!!!Exclusion for better security!!!!!
    snmp-server view ReadView-All 1.3.6.1.6.3.18 excluded
    snmp-server view ReadView-All 1.3.6.1.6.3.16 excluded
    snmp-server view ReadView-All 1.3.6.1.6.3.15 excluded
    snmp-server view ReadView-All 1.3.6.1.2.1.4.21 excluded
    snmp-server view ReadView-All 1.3.6.1.2.1.4.22 excluded
    !
    !
    !Here’s a write view which can be modified as needed to include or
    !exclude MIBs
    snmp-server view WriteView-ALL iso included
    !!!!!!!!Exclusions for better security!!!!!
    snmp-server view WriteView-All 1.3.6.1.6.3.18 excluded
    snmp-server view WriteView-All 1.3.6.1.6.3.16 excluded
    snmp-server view WriteView-All 1.3.6.1.6.3.15 excluded
    snmp-server view WriteView-All 1.3.6.1.2.1.4.21 excluded
    snmp-server view WriteView-All 1.3.6.1.2.1.4.22 excluded
    !
    !
    !!! Read/ Write group with ACL restriction
    snmp-server group SNMPv3-RW v3 priv read ReadView-ALL write WriteView-ALL  access snmp-allow
    !
    !
    !!!! Read only group with ACL restriction
    snmp-server group SNMPv3-RO v3 priv read ReadView-ALL access snmp-allow
    !
    !
    !!!Username is NetServices-RW, group is SNMPv3-RW I used DES for !priv as it’s more widely supported
    snmp-server user NetServices-RW  SNMPv3-RW v3 auth sha youpassword priv des yourpassword
    !
    !
    !!!Username is NetServices-RO, group is SNMPv3-RO
    snmp-server user NetServices-RO SNMPv3-RO v3 auth sha yourpassword priv des yourpassword
    !
    !
    !!!Monitoriing host that received SNMP traps via the username
    !NetService-RO I created above; so it uses NetService-RO for
    !auth and priv purposes
    snmp-server host 10.10.10.10 trap version 3 priv NetService-RO
    !
    !
    !!!This Enables all traps; you could modify it
    snmp-server enable traps


    1. snmpUsmMIB: management information definition for SNMP user-based security model

    2. snmpVacmMIB: management information definition for View-based Access Controll model for SNMP

    3. snmpCommunityMIB: this module defines objects for backward compatibility with v1 and v2c.


    Sunday, May 12, 2013

    Windows 下利用 WinSCP 执行定期备份任务


    利用 WinSCP 来备份数据已经很常用了,只要有 Linux 的 SSH 账号即可,但是有的时候,备份工作是烦锁,周期,没有激情的,每次都利用 WinSCP 连接、备份,很是麻烦,而且也会遗忘。
    其实利用 WinSCP 中的 winscp.com 能做到在命令行下备份,然后利用批处理执行定期任务。
    在 WinSCP 中正常添加主机的 SSH 账号,并且定义好主机名,比如:XXX
    在 WinSCP 目录中创建批处理文件 BakDB.bat,内容如下:
    option batch on
    option confirm off
    open XXX
    call ./backup_mysql.sh
    get /backup/* D:\BakDB\
    exit
    call ./backup_mysql.sh 是执行备份数据库的 shell 脚本,执行完成后复制 backup 目录下的所有文件保存到 D 盘的 BakDB 文件夹中。
    将该批处理添加到计划任务中即可周期自动运行,亦可手动双击批处理图标来执行备份操作。

    Saturday, May 11, 2013

    iBGP next-hop-self Not Working


    I've made some tests on dynamips ( ios 12.4 ) and next-hop-self
    doesn't work for ibgp routes on route-reflectors. However this seems
    to be the correct behavior according to cisco and juniper :


    http://www.cisco.com/en/US/docs/ios/12_2s/feature/guide/fs_bgpnh.html :

    Do not use the neighbor next-hop-self command to modify the next hop
    attribute for a route reflector when this feature is enabled for a
    route reflector client. Using the neighbor next-hop-self command on
    the route reflector will modify next hop attributes only for routes
    that are learned from eBGP peers and not the intended routes that are
    being reflected from the route reflector clients. To modify the next
    hop attribute when reflecting a route, use an outbound route map.


    http://kb.juniper.net/index?page=content&id=KB12984&actp=LIST :

    This is expected behavior. When you use Next-hop self on RRs, the
    cause only affects the next hop of eBGP learned routes (i.e.
    non-reflected routes). A RR reflects the same gateway for IBGP routes
    to other IBGP peers that it learns from the orginiating IBGP peer.
    The next-hop can only be modified for a reflected route via an
    outbound route-map.

    Please refer to RFC 1966 section 8, as follows:

    ++++++++++++++++++++
    In some implementations, modification of the BGP path attribute,
    NEXT_HOP is possible. For example, there could be a need for a RR to
    modify NEXT_HOP for EBGP learned routes sent to its internal peers.
    However, it must not be possible for an RR to set on reflected IBGP
    routes as this breaks the basic principle of Route Reflection and will
    result in potential black holeing of traffic.
    ++++++++++++++++++++


    Sunday, May 5, 2013

    First Hop Redundancy protocol comparison (HSRP,VRRP,GLBP)

    ProtocolFeatures
    HSRP
    (Hot Standby Router protocol)
    VRRP
    (Virtual Redundancy Router Protocol)
    GLBP
    (Gateway Load Balancing Protocol)
    Router role- 1 active router.- 1 standby router.- 1 or more listening routers.- 1 master router.- 1 or more backup routers.- 1 AVG (Active Virtual Gateway).- up to 4 AVF routers on the group (Active Virtual Forwarder) passing traffic.- up to 1024 virtual routers (GLBP groups) per physical interface.
    - Use virtual ip address.- Can use real router ip address, if not, the one with highest priority become master.- Use virtual ip address.
    ScopeCisco proprietaryIEEE standardCisco proprietary
    ElectionActive Router:
    1-Highest Priority
    2-Highest IP (tiebreaker)
    Master Router: (*)
    1-Highest Priority
    2-Highest IP (tiebreaker)
    Active Virtual Gateway:
    1-Highest Priority
    2-Highest IP (tiebreaker)
    Optimization featuresTracking
    yes
    yes
    yes
    Preempt
    yes
    yes
    yes
    Timer adjustments
    yes
    yes
    yes
    Traffic type224.0.0.2 – udp 1985 (version1)
    224.0.0.102-udp 1985 (version2)
    224.0.0.18 – IP 112224.0.0.102 udp 3222
    TimersHello – 3 secondsAdvertisement – 1 secondHello – 3 seconds
    (Hold) 10 seconds(Master Down Interval)3 * Advertisement + skew time(Hold) 10 seconds
    (Skew time)(256-priority) / 256
    Load-balancing functionality- Multiple HSRP group per interface/SVI/routed int.- Multiple VRRP group per interface/SVI/routed int.Load-balancing oriented- Weighted algorithm.- Host-dependent algorithm.
    - Round-Robin algorithm (default).
    Requires appropriate distribution of Virtual GW IP per Clients for optimal load-balancing.(generally through DHCP)Requires appropriate distribution of Virtual GW IP per Clients for optimal load-balancing.(generally through DHCP)Clients are transparently updated with virtual MAC according to load-balancing algorithm through ARP requesting a unique virtual gateway.

    * If the group VRRP Virtual IP on the master (higher priority) is the real IP configured on a different VRRP (Backup with lower priority) IOS will manage to make the VRRP router with the real IP, the master, by setting its priority to 255, knowing that the configurable range is [1-254].

    Gaia SNMP Configuration


    CheckPoint Gaia SNMP configuration

    Here is an example of SNMPv3 configuration in CheckPoint Gaia Appliace:
    set snmp agent on
    set snmp contact "[email protected]"
    set snmp location "Middle of nowhere"
    add snmp address 123.34.56.78
    set snmp agent-version v3-Only
    add snmp usm user snmpv3user security-level authPriv auth-pass-phrase 111222333 privacy-pass-phrase 555666777
    To use less secure version of SNMP v1/v2 use following commands:
    set snmp agent on
    set snmp contact "[email protected]"
    set snmp location "Middle of nowhere"
    add snmp address 123.34.56.78
    set snmp agent-version any
    set snmp community snmpv2community read-only
    Replace 123.34.56.78 with Firewall’s interface IP which is going to answer the SNMP requests. This command may be omitted – then SNMP will listen on all interfaces.
    If you want to enable SNMPv3 only you might want to remove the default “public” community from configuration file, but after changing the agent-version to v3-Only the firewall will reject your command:
    delete snmp community public read-only
    NMSSNM0075 SNMP v3-Only does not accept community strings.
    To work around this issue, just execute:
    set snmp agent-version any
    delete snmp community public read-only
    set snmp agent-version v3-Only


    Just select SNMP menu item from System Management menu.
    SNMP Setting von Check Point GAIA WebUI
    SNMP Setting von Check Point GAIA WebUI
    Then check the box for enabling the SNMP Agent, check the box for all the interfaces where you want the SNMP Agent to listen and press Apply.

    Then configure your SNMP community as needed and press Apply under this section again.
     
    Don’t forget to create a rule to allow SNMP access to your Security Gateway in your security policy and install it to get SNMP data.

    If you don’t like the WebUI you might also configure the SNMP settings from the CLISH command line.

    set snmp agent on
    set snmp agent-version any
    set snmp community ThisIsSoSecret read-only
    add snmp address 192.168.1.1


    We most recent SNMP MIB can be found on a GAIA installation with R75.45 at/opt/CPshrd-R75.40/lib/snmp/chkpnt.mib


    YouTube Channel